Monday, August 20, 2012

OK to Wake Alarm Clock

We finally got our "Ok to Wake! Alarm Clock" from Amazon. I love ordering from Amazon! They have always offered great customer service and they offer all sorts of things! This time we did have a little hiccup. My box came in on Friday. I was so excited because we had the weekend to try it out and get her used to it. When I opened the box, there were two jars of hair pomade! Did you even know they still made that stuff??? So I immediately went online and ordered a return label. Amazon said they would go ahead and send my replacement and it came today and it really couldn't have came at a better time! Here is an update from my previous post (you can see it here).

Sophie has been doing great! She has slept in her bed all night since we started her chart. We cheated this past Friday and gave her a treat early after five days instead of six, but she has continued to do well and I am so proud of her! Below is her chart with her smiley faces! This Wednesday is her next prize day! Sophie is proud of herself too. She even said the other day on the way home that she had to stay in her bed so she could get a smiley face on her chart. I reinforced her and told her she was right! She is working so hard!
:)

Now, we are to the reason I am so glad the clock came in today. Sunday, Sophie woke us up calling from her bedroom asking if she could get up. I told her no that it wasn't time yet. She waited an hour and hollered again. I told her she could come in. I just knew it was going to happen that she would start waking up and asking to come out of her room, thus my reasoning for ordering the clock. The same thing happened this morning with her waking a little before five.Thank goodness the clock came in today. Here are some pictures of it.

It came with two face plates. One is the daisy shown and the other is supposed to make it look like a bug.

It has a night light mode that stays on for two hours and then goes off. The clock runs on batteries so it has different power saving tricks. I didn't use this feature because she already has a nightlight.

When it is time to wake up it turns green and the animation changes on the clock to a face and its eyes move. It is pretty neat. 

The controls are concealed in the back. A toddler could get into it. So we have her clock on a high shelf, but she picked where it is so she can easily see it from her bed.

I showed her what color the clock turns and how that means she can get out of bed. I let her pick the spot that it went and she is so proud of it! She even asked me why I was taking pictures of her clock. I will update this post with how it works. I am not expecting an overnight miracle, but I hope it at least is a reminder for her to stay in bed and not yell to us about getting up. 

***Update***
The clock has worked great so far! Sophie stays in the bed until it turns green. We have one time of her climbing in the bed with us since all of this started and I am not sure she was completely awake when that happened. We did have to replace the batteries in it already but that was because I used whatever I could find in the house to put in it. We put brand new batteries in it and I am hoping it will last longer this time. I do wish it had the option to plug in. Sophie loves the night light feature on it which I am sure is part of the reason the batteries died, but it doesn't stay on all night. I think it goes off after an hour. I still recommend this clock! We have really enjoyed it!

Photobucket

Tuesday, August 14, 2012

Toddler Growing Pains!

Sophie can sense there is a change coming! She is acting out more, wanting me to hold her in my lap, and needing attention (good or bad). It has been rough!

One thing that had gotten really bad was Sophie's nightly visits to our bedroom. Sophie always goes to bed in her bed and very rarely fights us on it, but the sleepovers were getting bad! We are talking about coming in at 2:00 and us putting her back in bed at 3:00 and then being back in our room at 4:30 or 5:00 at which point we would just let her stay because we were getting up soon. We would tell her over and over that she needed to stay in her bed at night and that she was a big girl. We talked about when Maggie gets here she is going to have to be quiet and that Maggie may be in our room because she is a baby and we can't wake her. We tried every angle and nothing worked.

It came to a head this past Sunday. Sophie came in our room at her usual 2:00 and Klint put her back in bed at 3:30. We went back to sleep. She came back in our room between 5:30 and 6:00 (I was half asleep so I really don't remember.) She decided she wanted to sleep on top of my pregnancy pillow (Side note: This is the best pregnancy pillow ever!!! I highly recommend.) Well, she kept rolling off on top of me or on top of Klint. It was awful! Then, Klint tried to roll over and get away from her and banged his arm on the night stand. He just got up and went to the couch at that point. Sophie went and asked him why he left and he told her she needed to stay in her own bed. She came back and asked me if what he said was true and I told her yes. I repeated again everything I have said to her a million times. She told me okay and went back to sleep in Klint's empty spot. I knew that we hadn't gotten through. Well, because we had hardly any sleep the night before, we were really late for church. Another turning point for us in this battle...it was starting to interfere with everything.

Sophie likes to count down things and she really needs something she can physically see. So I made a chart to help her track her nights in the bed. I showed her the chart and explained that every night she stayed in bed she would get a smiley face on her chart. We explained again how she had to stay in bed all night and she could get up when we called her. She agreed and we hung it on the fridge. She has to make it six days in a week to earn a surprise (A movie from the $5 at Wal-Mart). Below is the chart.

Sunday night: Was rough! Sophie did stay in bed all night, but she had me up all night! At 1:00 she needed another kiss and a hug (as tired as I was, how could I deny her that?) and then at 3:30 she woke me up to tell me she needed to go potty. The next morning we told her we were so proud she stayed in her bed and didn't get in bed with us, but she didn't have to wake mommy and daddy to go to the potty. We told her she had a night light in the bathroom and she was a big girl and big girls go all on their own! She did get a smiley face.

Monday night: No Sophie in the bed! Woo hoo! Another smiley face and she didn't wake me or her daddy up for anything.

A friend, Jessica, suggested I order her an alarm clock that tells her when it is time to get up. I ordered it Sunday because I wasn't sure just the chart would work (in fact I am still a little skeptical it will continue to work.) and I thought I don't want her to yell to ask if she can get up when we have a sleeping baby in the house. This clock is really neat. You set the time and when it is that time, the clock turns green letting them know they can get up. I thought it was a very neat concept and one that would be easy to teach her. She is also interested in time right now so we can maybe start teaching her time with this clock. I'll update once it comes in on how it works.

So, two nights in and we are doing good so far. We reminded her again tonight about her chart and I hope that inspires her to stay in bed. Wish us luck!


Look at that face!!! So sweet! (And no, she did not wear this in public!)

Photobucket

Teacher Projects: Meeting Binder and Lesson Planner

Wow! I have missed blogging! It has been a couple of weeks and school is in full swing. Now that we have our routine back down, I will try to post more often.

I shared my Pinterest teacher projects in my post here. You can go back and see what I made. Honestly my favorite thing from the whole post is the To Do Frame. I used it everyday! It keeps me straight and make sure things that need to be done stay on my radar!


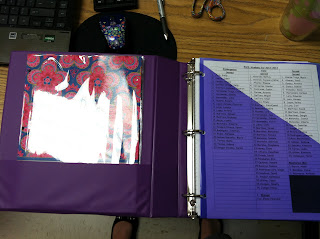
Another idea I saw on Pinterest was making a Binder for everything important. I decided to do this for my meetings that I attend through the school year. Normally I just use a regular notebook and it is so unorganized. I couldn't keep my notes straight. I couldn't find something I had written down from a previous meeting...it was horrible. So I decided to make a binder for all my meetings and after setting it up, I realize I go to a lot of meetings! Here is my notebook.


I put a copy of my roster in the front to have easy access when meeting with teachers or in case of a drill.

 I keep my calendar in the pocket so it is always with me and in easy reach.
 
My first section has all of my schedules. I have my personal schedule, my meeting schedules, and the district calendar.

I just hole punch my notes and put them where they go. So easy and organized!

All of my tabs! I go to a lot of meetings as I said before!


My lesson planner is something I started last year. I have to plan for three grades and I really didn't want to take home four different binders and other materials home to plan. I also didn't want to have a ton of stuff spread all over my desk. So, I put it all in one notebook and I love it! It is easy and compact and absolutely wonderful! (Can you tell I love it?) Here it is!
:)

My first section is my personal schedule and my roster of students. In the pocket I keep the rosters for my classes and any other information I might need.

The next section has my lesson plans. (Once again, an old lesson plan)

I divide the rest of my notebook for my grades. This is where I put my CCGPS. Our school district sends home what standards we will cover by nine weeks. These haven't came out yet, but when they do, I will add them to this section.


I also printed these posters to use too. I put them in my lesson plan book, but I may move them if they start taking up too much room. I got these here. (Thanks, DeeAnn for sharing the link!) They are free. You add them to your cart and then they email you the link to download them. So easy!

There you have it. My super organized binders. I hope I can keep it up for the rest of the year. I just love my binders!


Photobucket

Wednesday, August 1, 2012

Baby Kelly Update: The Big Reveal!

We went to the doctor today for my 16 weeks checkup and to take a peek at the baby to see if we could tell what he or she is...kind of getting old referring to the baby as "it"!

The doctor told us that all of my bloodwork for possible genetic problems came back fine and showed no problems. She said I was measuring right on and the heart beat was good. We asked her a few questions about traveling and I asked about getting the pertussis vaccination while I was pregnant. This was something my mom was horrified about and we heard a report that it is at an all time high for this year. She said I could get it after 20 weeks or I could wait and they would do it in the hospital. I want to go ahead a get it. I don't want to take any chances.

So she sent us to take our peek. We were so excited and Sophie was ready to see the baby. Here are a few pictures.


We were able to find out what we were having! She was about 85% sure. Here is what we found out!


As for the name, it will not be Kelly. Her name will be Margaret "Maggie" June. Margaret was Klint's grandmother's name and June is my mom and grandmother's middle name. We are so excited and can't wait to welcome Maggie! Keep praying for us!


Photobucket


Monday, July 30, 2012

Teacher Projects!

 So I did some Pinterest inspired projects for school this year. I just wanted to share a few of them.


This is my "To Do" dry erase frame. I bought the frame, markers, and paper from the Dollar Tree. It cost around $1.60 I am estimating because it was a whole pack of paper and a three pack of markers. Pretty excited about it and I have already put it to use. I want to add a bow to it, but I couldn't find my hot glue gun today. It got packed up somewhere....


This is my file organizer. I saw this on Pinterest and liked it because it was compact and there was a reason for it. I had a big medal file folder holder that just caught junk. I hope this will eliminate that. (And those are old lesson plans on the front. I'm good, but I am not that good!)


Straw dispenser turned pencil dispenser. Excited about this and hoping it will eliminate fighting over pencils!

Book covers for chair pockets. Amazing. I got these from the Dollar Tree. They are different as one has a deep pocket and the other has a strap, but I just wanted them to hold dry erase boards so no big deal. Love these!

I also did a meeting binder that I will share when I am finished with it and I am also going to share my lesson plan book.

The link to my board for these projects is here


Photobucket

Saturday, July 21, 2012

New adventures in domestication!

I spent all day Wednesday doing  freezer meals. Here is my post about that with an update. I also ran to the store and got two bag of peas and a big bag of peanuts to freeze. Klint came home Wednesday and said that he was going to get some corn from a manager at his office. I told him that was great because we love corn and we new it would be good to have some in the freezer! He called me Thursday and said he had the corn and it was a lot. Well, in my mind I pictured 40 to 50 ears of corn. What greeted me when I got home was a bag with almost 90 ears of corn. Here is a picture of about half of it!


So for the rest of Thursday I dedicated my time to research on corn and freezing it...fun day! So I knew Friday that not only was I putting up corn, but I also putting up peas I had bought the day before. When Klint came home that night, he had another surprise...Tomatoes! It was way more than what we could eat so we looked up how to can our own food which turned into another all night research project and after three calls to my grandma we decided we could do it....maybe!

Klint decided to take off Friday morning and help me with the corn and the whole canning process. We shucked corn and blanched our peas (which I had done before). Klint also froze some green peanuts that I bought when I got the peas.  Here is a picture of our clean corn and our peas!


Now, I do my peas a little different from some people. My grandma showed me how to do my peas and she said to keep the juice you cooked them in and put them back in. She said some people just put water and that is fine, but I like it with the juice from the peas. (I guess that is different. Let me know if it isn't.) We got eight bags of corn on the cob and two quart size bags of cream corn.

That night we made our first batch of jarred food...Salsa! I found a fairly easy recipe online and it made six jars. The salsa is really mild and taste so fresh. We had extra and I just put it in the fridge. We were a little worried because they didn't seal like I thought they would. I went to the freshpreserving.com website and reread again about making sure the jars seal. Once I pulled them, they sealed almost instantly! So happy!

Saturday we got up and went to the farmer's market and got more tomatoes, some banana peppers, and okra. We cut the okra and froze it. We used the banana peppers and made pepper relish. We used part of the tomatoes to make tomato relish and the rest will be used to make stewed tomatoes! I have called my grandma a few times just to verify certain things about canning and she has answered so patiently and everytime she says "It is so good you are putting up food for your family." and I can hear the pride in her voice! It is a good feeling!

Salsa, pepper relish, and tomato relish


My point in writing this is to say, don't be scared! Try new things. We are amateurs at this and have had some pretty good luck! Just follow the instructions and go with it!

I had to post a picture of what our sweet baby girl did the whole time we worked. She has been the best!


She colored and played so quiet! We are now having movie night with her!


Happy canning!
Photobucket

Wednesday, July 18, 2012

Freezer Meals, Part 3: Put it in the Ziploc and You Shake it All Around.....

See Part 1 and Part 2 by clicking link.

On Tuesday I got all my ingredients I was going to need for my meals. I also went ahead and made my bags for each meal with the instructions. I also went through and collected all of my recipes and put them in once document. You can get them here. Here is a picture of my bags.


I also used some Glad FreezerWare for my shredded chicken and my taco meat.  Here is a picture of them.


The first thing I did Wednesday was go through the freezer and organize and throw away! I hate to throw away food, but we had stuff from 2009!!! I was shocked! I also found a couple of bags of frozen chicken that I didn't know we had so I pulled it to do my shredded chicken. There is enough of it that I will have enough for at least 3 containers of shredded chicken for soup or rice. If I have any extra raw chicken I will just freeze it to grill or whatever we decide.

Jaima from Ring around the Rosies has 10 steps that she follows to do her meals. They are below.

"1) I made a list of my recipes. I used crock pot recipes I already had, plus some of Stephanie’s!
2) Then, I made an ingredient list and went shopping (don’t forget your freezer bags).

3)To start, I gathered all of the ingredients I needed. 
4) Then, I chopped all of the veges first. Dice all of your onions, carrots, peppers, and mince your garlic. 
5) Label your bags with the directions and 
6) THEN add your meats (I trimmed my chicken breasts and cut in half to have a total of 4 pieces of chicken strips per bag).
7) Add your veges. 

8)Add your other ingredients. 
9) Let out air, seal bag, and lay flat!
10) Freeze & Rejoice!"

The more I read them the more I was not sure they would work for me. I thought I would lose track of what I was doing. Here is what I did.

1) Looked up my recipes, made my grocery list, and went shopping.
2) Printed out my recipes and cut them apart. I wrote my instructions on my bags.
3) Separate all my meat into each bag.
4) Chop my veggies and add to bags. I kind of just went by the recipes at this point and added until the bag was done sealed it and put it up. I did not add my spices because I read in another blog that sometimes the taste can be distorted through freezing. I saved the recipes and will add when I make them.
5) Freeze and Rejoice!


Here are a few pictures of some of my meals done.

Meatloaf, two meals of hamburgers, and taco meat

Some of my chicken meals

Here is what I ended up with:
  • 5 packs of shredded chicken
  • 2 meals of hamburger patties (5 each)
  • 1 meatloaf
  • 2 gallons of spaghetti sauce
  • 1 pork loin marinated
  • 16 Crockpot meals
  • 2 packs of taco meat
  • 2 Chicken meals for stove top
That is 31 meals!!! Whoop whoop!  Plus I had a lasagna that I froze last week so I have 32 meals in the freezer ready to go! I am so excited and feel a little weight being lifted for this upcoming school year.

A few tips:
1. Pace yourself. Jaima said she got hers done in a two hour nap time and I can imagine once you are well practiced you could probably do that. It took me starting at 9:00 to 4:00 to get it done. (I did run to the grocery store in the middle of the day to get something for Klint).

2. Clean has you go. I did have to take the garbage out twice while doing this, but I would finish one stage and empty and do another stage and empty. I would also spray my counters and clean after each thing I did. It makes it easier!

3. Be careful while chopping and don't slice your finger...like I did! Eeek!

I am still in shock about having that many meals in my freezers, but it is a great feeling! 

Happy freezing!

Update: A few things I learned after the freezing happened!

1. Use the ziploc bags with the zip. They are way easier and they don't leak like a couple of the bags did all over my freezer!

2. Try to be careful how you put the bags in the freezer. Our chest freezer had a really hard time keeping up, but it finally did after a day and a half!  We learned that putting the food on the bottom instead of at the top helps.


Photobucket